|
Getting your Trinity Audio player ready...
|
Thanks to action cameras, especially GoPro cameras, I started to get pleased to the world of amateur video and photography. I used to see photos in social networks and tried to achieve the results, but I didn’t get the perfect result I wanted, the colors were not the same as mine.
Looking for information I found the usefulness of the neutral density filters and, after trying several brands without good results or ok result, since they were appreciated in the corners of the images and, in addition, they damaged the structure of the camera. I decided to try the Freewell ND Filters.
The result was incredible, thanks to them, the quality of my photos and videos increased a lot. In my opinion a must have accessories for any GoPro User , One of the things I like best about Freewell filters they are made of optical glass & they are multicoated which helps in reducing flares specially seen in all gopro cameras.
In this post I have used GoPro Hero5 Black as an example , I will explain my experience with these filters and why and when I use each of them.
Filter Kit I have used is Freewell Hero 5 ND Filter 4Pack & Freewell Hero5 ND1000 (All Hero5 & Hero6 accessories are same)
What’s a ND filter?
For those who don’t know, a ND filter (Neutral Density Filter) is a type of filter that reduces the amount of light that enters our camera through the lens.

Which filter I have to choose?
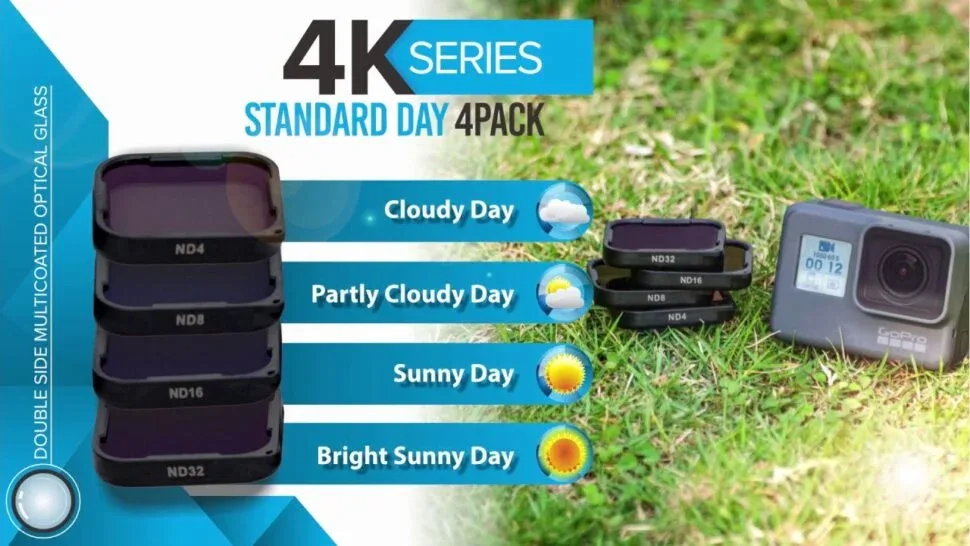
Not all filters work equally, some allow more % of light to pass than others and especially at the beginning, it can be a bit messy to choose the right filter. Freewell offers 5 different neutral density filters and to make things a little easier I’ll summarize when to use each of them in the following table.
| F-Stops | Optical density | Use | |
|---|---|---|---|
| ND4 | 2 | 0.6 | Cloudy |
| ND8 | 3 | 0.9 | Partially cloud |
| ND16 | 4 | 1.2 | Sunny |
| ND32 | 5 | 1.5 | Very Sunny |
| ND1000 | 10 | 3.0 | Long Exposure |
To choose the right filter, we will have to do it based on the weather at that precise moment.
On cloudy days, it’s obvious that we should choose a low neutral density filter as in the following example. Thanks to this we will gain saturation and we will not have such a gray image.

Settings: Single shot PT: Off
But what happens on days when the sun slips through the clouds?
According to my experience, it’s better to bet on a filter of greater density when we are choosing one of them. So, we will avoid that our image will be burned, especially on clear days or when the sun shines brightly. We can always reduce the tones of the image in postproduction, but we couldn’t fix a burnt photo.

Settings: Single shot PT: Off
What camera settings should we use?
The configuration of the camera, in this case I mean the Protune settings, will always depend on the situation in which we find ourselves. But as a personal opinion, if we activate the RAW option and take the photo with this format, when editing the photo on the computer, we can always retouch all the values that Protune offers (and even more) in all its range. In other words, we would not work according to the values we would have chosen when making the photograph. What we would do is edit the photograph from scratch on our computer, which will give us a lot of freedom to choose the final result.
How to edit the photos to get an incredible result?
Personally, to obtain the final result retouching values of exposure, saturation, colors, etc., I use Adobe’s Lightroom software. With it, in a very simple way and thanks to the work that the filters will have done in our camera, we will obtain our perfect photo in a very short time.

Settings: Burst mode (30/3”) Protune: Off
In short, whenever I take my GoPro, I carry these filters with me. They are easy to place, easy to use and even with them, we will obtain results that would be impossible to achieve if we were not using them, as in the case of long exposure photography.
Here you can see an example, but stay tuned to the next post about this type of photographs.

Settings: Night Photo , Shutter: Auto , Protune : ON , WB: Native , Color: GoPro Color
See you in the next post!
Author : Alberto Lopez